How to develop a Firefox extension
Admit that you have always wanted to know how to develop a Firefox extension but never had the time to learn. 🙂 Here I will walk you through and at the end of the article we will have created a fully functional Firefox extension!
Our objective
We will create a Firefox extension to find all links in the current web page, highlight those which have a target attribute and alert you how many links it found. The good part is that once you have done this, you have both an understanding of Firefox extension development as well as a blueprint for any extension you would want to develop in the future.
What you need – setting up the developing environment
First, let’s start with setting up your development environment. You need Firefox (duh) and basically whatever code editor you prefer. Then, there are some recommended things to do to prepare Firefox:
Create a different development profile
The first step is to create a different profile in Firefox, since you will do some settings and changes that you probably don’t want for your regular profile. In my case, I’ve created a new development profile named “dev”. The steps to do this are:
Profile manager on Windows
Open the Windows Start menu and choose the Run option (on Vista, it might not be there – just press Windows key + R in that case). In the run dialog, write firefox -P and press enter/click OK. Choose Create Profile in the dialog and follow the steps.
Profile manager on Mac
Open the Terminal (located under /Applications/Utilities) and type in /Applications/Firefox.app/Contents/MacOS/firefox -profilemanager. Choose Create Profile in the dialog and follow the steps.
Profile manager on Linux
Open a terminal, use cd to navigate to your Firefox directory and then enter ./firefox -profilemanager. Choose Create Profile in the dialog and follow the steps.
Configuration settings for Firefox
Open Firefox through the Profile Manager (process described above, or set the development profile as default during extension development). Then enter about:config in the address bar. It will warn you about changing settings, but it’s ok since what you will do is only minor changes for development. You can filter the existing settings, and if any of the below settings don’t exist, you can just create them.
Recommended settings
These are good to enable extension errors in the Firefox Error Console (Tools > Error Console), disable XUL caching and such.
javascript.options.showInConsole = truenglayout.debug.disable_xul_cache = truebrowser.dom.window.dump.enabled = true
Optional settings
These aren’t necessary, but they might help you out. Personally, I don’t use these.
javascript.options.strict = trueextensions.logging.enabled = true
Point your Firefox extensions directory to your extension
Instead of constantly preparing and reinstalling your extension, there’s a simple way to add a pointer from your Firefox extensions directory to your code location. To do this, you must first find your profile directory:
Find your profile directory
The profile directory is where you will find all the settings for your Firefox profiles, including extension information.
Find profile directory on Windows
In Windows 2000 and XP, open Explorer and go to C:\Documents and Settings\[your user name]\Application Data\Mozilla\Firefox\Profiles and in Vista, go to C:\Users\[your user name]\AppData\Roaming.
Find profile directory on Mac
Open the Terminal and type in cd ~/Library/Application\ Support/Firefox/profiles/. There you will find your Firefox profiles, and they will be named with letters and numbers, followed by a dot (.) and then your profile name, e.g. 12a3bc4d.dev.
Find profile directory on Linux
Open a terminal and type in cd ~/.mozilla/. In that location, you will find all your Firefox profiles, and they will be named with letters and numbers, followed by a dot (.) and then your profile name, e.g. 12a3bc4d.dev.
Pointing to an extension
In your development profile folder, you will find a folder named extensions. In it, you will have code for all your installed extensions. Instead of placing your code there, you can create a pointer file. Do that by creating a file with a unique name for you (this will have to be the same as you chose for your em:id value in your install.rdf file – more on that below).
In the case of our example, create a file named linktargetfinder@robertnyman.com, without any extension, and in it just point it to where you will have your code, e.g. C:\extensions\ (Windows) or ~/Sites/linktargetfinder/ (Mac).
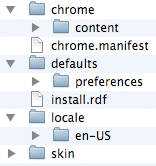
Creating folder structure and files
What is needed to have a good base for your extension development, is to create the structure of the extension code. Start by creating this hierarchy:
install.rdf
We begin with the intimidating code of install.rdf. This is where you will have all the meta information about your extension, which versions of Firefox it supports and other assorted information. Our install.rdf will look like this:
<?xml version="1.0"?>
<RDF xmlns="http://www.w3.org/1999/02/22-rdf-syntax-ns#"
     xmlns:em="http://www.mozilla.org/2004/em-rdf#">

	<Description about="urn:mozilla:install-manifest">
		<em:id>linktargetfinder@robertnyman.com</em:id>
		<em:name>Link Target Finder</em:name>
		<em:version>1.0</em:version>
		<em:type>2</em:type>
		<em:creator>Robert Nyman</em:creator>
		<em:description>Finds links that have a target attribute</em:description>
		<em:homepageURL>http://www.robertnyman.com/</em:homepageURL>
		<em:optionsURL>chrome://linktargetfinder/content/options.xul</em:optionsURL>

		<em:targetApplication>
			<Description>
				<em:id>{ec8030f7-c20a-464f-9b0e-13a3a9e97384}</em:id>
				<em:minVersion>2.0</em:minVersion>
				<em:maxVersion>3.1b2</em:maxVersion>
			</Description>
		</em:targetApplication>
	</Description>
</RDF>
Scary, right? Well, even if your not used to RDF it’s not that bad at all. Like most code, there’s some mandatory information that you will never need to change, and then some of your own to sprinkle in. The interesting parts for us are:
In the Description node
em:id- This is where you add your unique developer id, of your own choosing. Note that this has to be the same as the pointer file you created above.
em:name- The name of your extension.
em:version- Current version of your extension.
em:type- The type declares that is an extension, as opposed to, for instance, a theme.
em:creator- Well, you!
em:description- Describes your extension functionality. Will be shown in the Tools > Add-ons window.
em:homepageURL- The URL of your extension’s web site.
em:optionsURL- The URL to where you will have your file for editing options/preferences.
In the Description/em:targetApplication node
em:id- This value is the actual id of Firefox. Change this if you want to develop for Thunderbird or something else.
em:minVersion- The minimum version of Firefox required to run the extension. Valid Application Versions.
em:maxVersion- The maximum version of Firefox required to run the extension. Valid Application Versions.
Read about more options in Install Manifests.
chrome.manifest
The chrome of Firefox is everything around the content window. i.e. web browser toolbar, menus, statusbar etc. The next file for our extension, which will probably feel a bit awkward to edit, is the chrome.mainfest file. This one, however, is in conjunction with install.rdf the key to how your extension will be added to Firefox, and how it will work. Our chrome.manifest file looks like this:
content     linktargetfinder    chrome/content/
content     linktargetfinder    chrome/content/ contentaccessible=yes
overlay chrome://browser/content/browser.xul chrome://linktargetfinder/content/browser.xul

locale	linktargetfinder	en-US	locale/en-US/

skin	linktargetfinder	classic/1.0	skin/
style	chrome://global/content/customizeToolbar.xul	chrome://linktargetfinder/skin/skin.css
So, what are all those options? Let’s go through them:
content linktargetfinder chrome/content/- The path to where your extension content files will be found.
content linktargetfinder chrome/content/ contentaccessible=yes- Same as the above, but when
contentaccessible=yesis added, it allows Firefox 3 and later to access the extension’s files and show them in the web browser (like within a web page). Found this excellent help through Web pages accessing chrome:// is forbidden. overlay chrome://browser/content/browser.xul chrome://linktargetfinder/content/browser.xul- The path to which file you will use to override web browser elements, and add items to the toolbar, menu and statusbar.
locale linktargetfinder en-US locale/en-US/- Used for localization of content.
skin linktargetfinder classic/1.0 skin/- Skin reference.
style chrome://global/content/customizeToolbar.xul chrome://linktargetfinder/skin/skin.css- Style overlays for chrome pages.
More information can be found in Chrome Manifest.
chrome folder
Ok, once the mandatory parts are out of the way, now things start to get interesting. This is also when we start to look at XUL, which stands for XML User Interface Language. It is developed by Mozilla to create interfaces in Firefox, Thunderbird etc.
First, within the chrome/content folder, create three files:
browser.xuloptions.xullinkTargetFinder.js
browser.xul
This is the file we will use to override some of the default look of the web browser, i.e. add a button to the toolbar, an item to the Tools menu and a statusbar icon. Let’s look at the complete browser.xul file and then break it down:
<?xml version="1.0"?>
<?xml-stylesheet href="chrome://linktargetfinder/skin/skin.css" type="text/css"?>
<!DOCTYPE linktargetfinder SYSTEM "chrome://linktargetfinder/locale/translations.dtd">
<overlay id="sample" xmlns="http://www.mozilla.org/keymaster/gatekeeper/there.is.only.xul">
		<script src="linkTargetFinder.js" />

		<menupopup id="menu_ToolsPopup">
			<menuitem label="&runlinktargetfinder;" key="link-target-finder-run-key" oncommand="linkTargetFinder.run()"/>
		</menupopup>

		<keyset>
			<key id="link-target-finder-run-key" modifiers="accel alt shift" key="L" oncommand="linkTargetFinder.run()"/>
		</keyset>

		<statusbar id="status-bar">
			<statusbarpanel id="link-target-finder-status-bar-icon" class="statusbarpanel-iconic" src="chrome://linktargetfinder/skin/status-bar.png" tooltiptext="&runlinktargetfinder;" onclick="linkTargetFinder.run()" />
		</statusbar>

		<toolbarpalette id="BrowserToolbarPalette">
			<toolbarbutton id="link-target-finder-toolbar-button" label="Link Target Finder" tooltiptext="&runlinktargetfinder;" oncommand="linkTargetFinder.run()"/>
		</toolbarpalette>
</overlay>
First, there some general XML syntax, then you include your CSS code and set a DOCTYPE for localization. It’s followed by the overlay root element with its Ghostbuster-inspired namespace (developers are truly geeks 🙂 ).
After that you’re free to write whatever XUL you want, and basically it’s like HTML should’ve been. What I mean with that is that it is filled with basic interface options that can’t be found anywhere in HTML. For a complete overview of what you can do, please read the XUL Reference.
In our code here, we start with adding a menu option to the Tools menu in Firefox, and connect it to a keyboard shortcut:
<menupopup id="menu_ToolsPopup">
	<menuitem label="&runlinktargetfinder;" key="link-target-finder-run-key" oncommand="linkTargetFinder.run()"/>
</menupopup>

<keyset>
	<key id="link-target-finder-run-key" modifiers="accel alt shift" key="L" oncommand="linkTargetFinder.run()"/>
</keyset>
Followed by adding an icon to the Firefox statusbar:
<statusbar id="status-bar">
	<statusbarpanel id="link-target-finder-status-bar-icon" class="statusbarpanel-iconic" src="chrome://linktargetfinder/skin/status-bar.png" tooltiptext="&runlinktargetfinder;" onclick="linkTargetFinder.run()" />
</statusbar>
And at the end, we add a button to the Firefox toolbar:
<toolbarpalette id="BrowserToolbarPalette">
	<toolbarbutton id="link-target-finder-toolbar-button" label="Link Target Finder" tooltiptext="&runlinktargetfinder;" oncommand="linkTargetFinder.run()"/>
</toolbarpalette>
Note that you need to go to View > Toolbars > Customize… to add your button to the visible toolbar.
In the above examples, you might have noticed the &runlinktargetfinder; code. That is used for localizing text, and its translation can be found in the locale folder. More on that later.
Another thing to notice, which can be tricky at first, is that some ids and classes for XUL elements actually have meaning for its display, stemming from core Firefox code. Make sure to read the XUL Reference thoroughly for the elements you’re using.
If you want to use regular HTML elements instead of/together with XUL, you can include the XHTML definition in your root element, and then include any HTML element with the html: prefix. Like this:
<overlay id="sample" xmlns="http://www.mozilla.org/keymaster/gatekeeper/there.is.only.xul" xmlns:html="http://www.w3.org/1999/xhtml">

<html:input type="submit" value="Send" />
options.xul
This file is used for the options/preferences dialog for your extension, and its path is pointed out in the install.rdf file in the Description/em:optionsURL node. The complete options file for our extension looks like this:
<?xml version="1.0"?>
<?xml-stylesheet href="chrome://global/skin/" type="text/css"?>

<prefwindow
     title="Link Target Finder Preferences"
     xmlns="http://www.mozilla.org/keymaster/gatekeeper/there.is.only.xul">

	<prefpane label="Link Target Finder Preferences">
		<preferences>
			<preference id="link-target-finder-autorun" name="extensions.linktargetfinder.autorun" type="bool"/>
		</preferences>

		<groupbox>
			<caption label="Settings"/>
			<grid>
				<columns>
					<column flex="4"/>
					<column flex="1"/>
				</columns>
				<rows>
					<row>
						<label control="autorun" value="Autorun"/>
						<checkbox id="autorun" preference="link-target-finder-autorun"/>
					</row>
				</rows>
			</grid>
		</groupbox>

	</prefpane>

</prefwindow>
Again, some regular XML information and styling of the content. It then uses some XUL to layout the content of the preferences dialog. The interesting part here, though, is connecting the user input to the actual settings for the extension (those settings are to be found in the prefs.js file, mentioned in detail below).
To start with, you create a preferences group in the options.xul file with your desired preferences. Then, give each preference an id and connect it to the extension’s real preferences with the name attribute:
<preferences>
	<preference id="link-target-finder-autorun" name="extensions.linktargetfinder.autorun" type="bool"/>
</preferences>
Then you create an element and add a preference attribute to it, pointing to the before-chosen idattribute for the preference in the preferences group. It will then automatically connect its value to that specific preference.
<checkbox id="autorun" preference="link-target-finder-autorun"/>
Note that you don’t need to add an OK button for the dialog – for instance, on Macs there won’t be one while it’s automatically added for Windows users. All about system compatibility, my friends.
linkTargetFinder.js
If you’re like me, this is where you will feel at home. Good ol’ JavaScript code. 🙂
What’s nice here is that you can script any element in the XUL and any element in the HTML content window as well. All you need to access the content window is to precede your document call with the content keyword, like this:
content.document.getElementsByTagName("a");
Here’s the complete code of the linkTargetFinder.js file:
var linkTargetFinder = function () {
	var prefManager = Components.classes["@mozilla.org/preferences-service;1"].getService(Components.interfaces.nsIPrefBranch);
	return {
		init : function () {
			gBrowser.addEventListener("load", function () {
				var autoRun = prefManager.getBoolPref("extensions.linktargetfinder.autorun");
				if (autoRun) {
					linkTargetFinder.run();
				}
			}, false);
		},

		run : function () {
			var head = content.document.getElementsByTagName("head")[0],
				style = content.document.getElementById("link-target-finder-style"),
				allLinks = content.document.getElementsByTagName("a"),
				foundLinks = 0;

			if (!style) {
				style = content.document.createElement("link");
				style.id = "link-target-finder-style";
				style.type = "text/css";
				style.rel = "stylesheet";
				style.href = "chrome://linktargetfinder/skin/skin.css";
				head.appendChild(style);
			}

			for (var i=0, il=allLinks.length; i<il; i++) {
				elm = allLinks[i];
				if (elm.getAttribute("target")) {
					elm.className += ((elm.className.length > 0)? " " : "") + "link-target-finder-selected";
					foundLinks++;
				}
			}
			if (foundLinks === 0) {
				alert("No links found with a target attribute");
			}
			else {
				alert("Found " + foundLinks + " links with a target attribute");
			}
		}
	};
}();
window.addEventListener("load", linkTargetFinder.init, false);
While it’s a fair bit of code, it is also very basic. When the window loads, it runs the init method of the linkTargetFinder object. If the preference autorun is set to true, it calls its run method immediately. Otherwise, it will only be called when the toolbar button, menu item or statusbar icon is clicked. This happens through the oncommand attribute on the elements in the browser.xul file.
The code in the run method is pretty straight-forward. It adds a CSS file from the extensions chrome folder to the current document, finds all links in it, loops through them and checks if they have a target attribute, counts those, highlights them and alerts you with the number of hits.
As you can see, there’s a pointer in the code to something called gBrowser. That is how to get a reference to the current web browser, and you could also use getBrowser() as well. Note that this sort of code is only available from within the XUL context of the web browser. More information and options can be found in Tabbed Browser.
The only unusual part for a JavaScript is the variable prefManager, which connects to Firefox preference manager, and later gets the autorun preference with the help of this code:
var autoRun = prefManager.getBoolPref("extensions.linktargetfinder.autorun");
The three types of extension preferences are string, integer and boolean, and the six methods to work with them are:
getBoolPref()setBoolPref()getCharPref()setCharPref()getIntPref()setIntPref()
defaults folder
Within the defaults folder, you create a preferences folder and in that one a file named pref.js. This is used for the preferences you want to use for your extension, and looks like this:
pref("extensions.linktargetfinder.autorun", false);
locale folder
Used for localization. In our case here, we just have one child folder for en-US content, but it can be easily extended. That folder has a file named translations.dtd, which contains translations for entities used in XUL files. Our file looks like this:
<!ENTITY runlinktargetfinder "Run Link Target Finder">
Remember &runlinktargetfinder; in the browser.xul file? This is where it gets its translation.
skin folder
Now when we have all functionality in place, let’s make things a little more pretty (just a little, ok?). In our skin folder, we have three files: skin.css, status-bar.png and toolbar-large.png. The images are, naturally, used for the toolbar and statusbar respectively.
The CSS in skin.css is used for setting the image for the toolbar, the size and space for the statusbar icon and the highlight look of links with a target attribute. The code looks like this:
#link-target-finder-toolbar-button {
	list-style-image: url("chrome://linktargetfinder/skin/toolbar-large.png");
}

#link-target-finder-status-bar-icon {
	width: 83px;
	margin: 0 5px;
}

.link-target-finder-selected {
	outline: 2px solid red !important;
}
Packaging and installing
Firefox extensions are delivered like XPI files, and those are basically just ZIP files with another extension. Therefore, when you’re finished with your extension, all you need to do is ZIP your files together and give it an XPI extension. Note: do not ZIP the containing folder for your extension, just its contents (chrome folder, chrome.manifest and install.rdf files etc).
Once you have your XPI file, you can just drag and drop it into Firefox, and it will automatically install.
Packaging with Windows
Select all the contents of your extension folder, right-click and choose Send To > Compressed (Zipped) Folder. Rename it to .xpi instead of .zip and you’re done!
Packaging with Mac
Open the Terminal, navigate to your extension with the cd command and then type in zip -r LinkTargetFinder.xpi *. Ta daa!
Packaging with Linux
Open a terminal, get to your extension folder, and type in zip -r LinkTargetFinder.xpi * All done!
Distribution of your extension
There are two options of distributing your extension. Either use addons.mozilla.org or host it yourself. If you do it yourself, you can specify an updateURL in your install.rdf file, but note that since Firefox 3 it has to be a secure location, e.g. through SSL or similar.
Personally, I’d recommend addons.mozilla.org for greater reach, auto-update pushing and statistics. The downside of it, though, is that the review process can take quite some time for your extension to get an approval. Before that it can still be downloaded as an experimental add-on, but people need to have an addons.mozilla account and log in to do so.
To make sure it doesn’t take longer than necessary, I recommend reading
Successfully Getting your Addon Reviewed.
Downloads
All the code I’ve created here is available both as a ZIP file of everything, so you can start experimenting, change stuff and see what happens. It is also available as an XPI file, which you can install in your Firefox just to test the functionality (drag and drop it into Firefox).
Happy extension developing!
I hope this has been a good, albeit long, introduction to Firefox extension development and that it has helped you to grasp concepts you hadn’t gotten full control over yet. Good luck, and don’t hesitate to ask if you have any questions!
I'm not one to believe in it, but this must be Karma.
Today, just a few hours ago, a brief thought ran through my head about making an extension. Now, this shows up!
This will truly be invaluable for me. And I'm sure it wil be for many other folks as well. Thanks for such a helpful and thorough post!
(Too bad this weekend I'll be away from a computer… the horror…)
Good detailed post on developing extensions. May be in future you can post more on how to write extensions specifically for firefox toolbar, statusbar or sidebar.
Massive post Robert, you DO make me happy 🙂 YAY.
So true…, many thanks for the tutorial Rob!
[…] How to develop a Firefox extension – Robert’s talk – Web development and Internet trends "Admit that you have always wanted to know how to develop a Firefox extension but never had the time to learn. Here I will walk you through and at the end of the article we will have created a fully functional Firefox extension!" (tags: development tutorial howto firefox plugin) […]
[…] How to develop a Firefox extension – Robert’s talk – Web development and Internet trends (tags: firefox plugin) […]
Great writeup!
Couldn't help myself but drop a link to my tool that generates sceleton extension to get you started quickly taking care of directory structure and the boring details.
http://tools.w3clubs.com/ext/
nice work robert. i was wondering though, is there a way to use a javascript library within an extension or do we have to stick to standard scripting ?
my bad, a quick google gave me this: jQuery in firefox extension
Thanks for this. Very helpful. Even if I never have a reason to develop an extension for the rest of my life, at least I know what tools are in the toolbox. (I'm not real familiar with FF under the hood.)
Would love to you run-down Adobe AIR, also.
Thanks everyone for your kind comments!
Dan,
Wow, talk about a psychic connection! 🙂
Ajit,
Thank you. Maybe in the future I'll write more in detail about that.
icaaq,
Glad to make you happy! 🙂
JG,
You're welcome!
Stoyan,
Thank you! And thanks for the tip!
seengee,
Thanks! And yes, it's easy to use any JavaScript library you want to. I've used jQuery in my Flickr Gallery Plus! extension, for instance.
To complement the article, you can also refer to the jQuery object in the page from XUL like this:
<code>$ = content.wrappedJSObject.jQuery;</code>
Richard,
Thank you! Adobe AIR would be nice, although it's not likely; currently I'm not very fond if it, to be honest.
If you're not fond of Adobe Air, I'd like to hear why you don't like it.
Sometimes a negative review – a critique, if you will – can be as helpful as a positive one.
Richard,
Agreed that both positive and negative reviews can be helpful.
It's not really the proper context to discuss it further right here, but I wrote about it last June in Thoughts on developing with the Adobe AIR framework.
[…] How to develop a Firefox extension – Robert’s talk – Web development and Internet trends (tags: tutorial mozilla) […]
[…] Reposted with permission from Robert Nyman: […]
Thanks for a really good post Robert. Posts like these are very valuable to the community. Keep up the good work.
Mattias,
Thank you!
[…] wieder eine gute Anleitung zum Schreiben eigener Firefox-Extension gefunden, die ich durchaus für lesenswert halte. Der […]
Oh ! great tutorial Robert ! I am new in your blog and it's a very cool discovery !
[…] How to develop a Firefox extension – Robert’s talk – Web development and […]
very nice and useful addon tutorial for a beginner…
i ll b more happy if u could provide tutorial for "system call" aftr URL has been entered….
yours lovingly and sincerely,
anoop k nair
11-02-2009
Edmar, anoop,
Thank you!
Not sure what I will write about next time, but somewhere in the future I might write a follow-up article.
hi robert, small issue i noticed in your code above but corrected in your sample code provided, in install.rdf:
<code><?xml version="1.0"?>
<RDF xmlns="http://www.w3.org/1999/02/22-RDF-syntax-ns#"
xmlns:em="http://www.mozilla.org/2004/em-RDF#"></code>
should be:
<code><?xml version="1.0"?>
<RDF xmlns="http://www.w3.org/1999/02/22-rdf-syntax-ns#"
xmlns:em="http://www.mozilla.org/2004/em-rdf#"></code>
the capitalisation of RDF was throwing an error in installation (FF3 on vista)
Exacly, seengee.
Now, my test works! 😉
Thanks.
seengee,
Oh, really?
Thanks for the information!
by the way Robert, you mention about "Pointing to an extension", on windows do you mean a shortcut ? a text file containing the correct path to the extensions ? this is the only part that wouldnt work for me so i would appreciate if you could clarify
thanks a lot.
seengee,
Just create a file with no extension, and let its content be the path to your extension, e.g. <code>C:extensions</code>.
thanks Robert that works great, sorry but i'm going to hassle you with one more question though. I am including jQuery like:
<script type="application/x-javascript" src="chrome://notifier/content/jquery-1.3.1.min.js" />
but it throws an error in the console straight off:
<cite>Error: S.firstChild.getAttribute is not a function
Source File: chrome://notifier/content/jquery-1.3.1.min.js
Line: 19</cite>
Is there something fundamental i have done wrong here ?
sorry, should have said am including jQuery in browser.xul like:
<code>
<?xml version="1.0"?>
<?xml-stylesheet href="chrome://pxnotifications/skin/skin.css" type="text/css"?>
<!DOCTYPE pxnotifications SYSTEM "chrome://notifier/locale/translations.dtd">
<overlay id="sample" xmlns="http://www.mozilla.org/keymaster/gatekeeper/there.is.only.xul">
<script type="application/x-javascript" src="chrome://notifier/content/jquery-1.3.1.min.js" />
<script type="application/x-javascript" src="chrome://notifier/content/notifications.js" />
</code>
seengee,
No problem! I don't think you can use jQuery in the actual browser context, but rather just in the web browsing area. In your script, which will be run in a XUL environment, not the web browsing part, lots of things are different.
However, if you want to use jQuery to manipulate something in the actual page, you can dynamically add it to the HTML window and work it from there.
For instance, I use it in my Flickr Gallery Plus! extension, and you can look at the source code to see how jQuery is added.
thanks robert, i was kind of coming to that conclusion myself although this link seems to imply different, only difference is the version of jQuery being used. I also tried prototype but got another arbitrary error message so i'm pretty sure its not possible. Interesting hint about embedding jQuery into the actual document for manipulation but unfortunately the extension i want to make will be inside the chrome only. oh well, time to brush up on lib-less javascript, its been a while!
thanks again.
seengee,
In theory, jQuery might work within a XUL context, but I don't know enough about the inner workings of jQuery to guarantee that or explain your errors. I guess it comes down to testing and seeing what happens. 🙂
Robert, this is really great! thank you for pulling together all the details!! am curious if you're familiar with conduit? (http://www.conduit.com) — the platform allows anyone to build their own toolbar (branded, gadgets, etc.) with limited to no technical skills. Would love to chat with you more about it!
shiri,
Thank you!
It looks like a nice offering, although toolbars overall, in my humble opinion, have a tendency to get a little too niched.
Thanks for such a great tutorial. I installed this extension on my computer, but there is a problem I see. The Toolbutton is not displayed in the Toolbar, even in Customize dialogbox, the toolbutton is not shown. The MenuItem in Tools menu, and image in Statusbar are working properly. Please help me to solve this issue.
Thanks
Prem,
Thank you!
Please look under View > Toolbars > Customize in Firefox (perhaps restart Firefox as well). I just tested in Mac OS X and Windows XP and the icon shows up there – hopefully it should do it for you as well.
hello robert..jst wanna to bump u with another q…is it possible to build an antiphishing plugin for firefox..nd is there password hashng feature already implemented in it…?coz i wld like to build a mozilla antiphishing plugin with password hashing feature…hope u wld reply to me (hehe)!!nyways gr8 and awesome tuorial..i cld make my first sample addon with it!!ty… cheers..
nd yeah i lways wanna ask this..wats the diference b/w adon and extension(it may be foolish)but plzz help me…ty ….
anoop,
Glad to hear that it helped you develop your first extension!
Regarding anti-phishing, as far as I know at least, there's no native support for password hashing.
Perhaps you should ask Rey Bango, maybe he can help you further.
Add-on and extension are basically the same thing, it seems to be more about what people choose to call it.
@anoop: I don't have an answer for you in terms of password hashing but I would urge you to visit Mozilla's IRC server (irc.mozilla.org) and pose that question on #addons.
ty very much Robert nd Rey sirs fr ur valuable suggestions!i wld be more happy with jst one more help( 🙂 )…..our guide has given us a project to build a 'universal' plugin(u see it shld work on all browsers but later we decided it to be only fr mozilla)..we fnd that firefox does a auto passwrd hashing itself(jst cldnt find how! )..but our plugin must do it using sha1 algo….also the plugin shld do the antiphishing thing by using an xml database.!!(u see ther are w3c sites that hav list of phishing sites-blacklists-which we need to check bfore the client request get to the server)..all this stuff done by a plugin!!:(…SO MY REAL Q IS i jst wanna know whether it s possible to build such a thing in the first place!!!!!ty again….cheers!!
sir i too hav the same prblm(coz we 2 are a team in this project)..we know it shld be done using javascript …my part s to retrieve the URL using the plugin without the request goin to the server for checkn with the blacklisted sites…can u help me with the codes sirs??it shld direct to another secure page(which contains warning abt the page !we hav done that page !!)….it may be too much to ask but we r looking fr help frm werever we cn get!!nd ty very much for that xcelent tutorial..it helped to buy us some time fr this project and understand the stuff !!thank you..
I'm sorry, I don't know the answer. Please try the IRC server Rey suggested above.
okk ty no worries 🙂 … the project s so important fr our academics..nyways thanks fr eveything …(we dnt hav acees to chat client)..
wow thats a cool project you ppl are doing. Best Wishes.
hi Robert nice tutorial !what is this profile folder?what is it used for?Is it to create our own profile for firefox sessions?
Jeff,
Yes, you can have different profiles for Firefox with various settings, extensions and such.
GREAT
I have been looking for your article for hours!!!
finally I found an example that doesn't talk about Firefox 1.5
I give it a quick look, but I'm sure it's wat I was looking for.
I'm going to follow your instructions asap for developing my first extension.
Bye bye, Jack
Jack,
Great to hear! Good luck! 🙂
thanks for the talk yesterday in berlin, very good for someone who never worked with this stuff before, will try now to write my first addon
Very glad to hear that you liked it! Good luck with developing, let me know if you have any questions!
Thanks for the talk in Berlin too – enjoyed it, and have started on my first extension after doing the bootcamp tutorial!
Ok, so the main questions I have are:
"OK, so I want to do x with my addon, how do i find what functions and args I have access to for a particular topic – much like php.net/array gives you a nice overview of the topic and functions, is there a similar developer.mozilla.org/storage or developer.mozilla.org/function/foo?"
"Hold up, what functionality can I actually do with addons? What can't I do – no good having this fantastic idea, and not being able to do it! Is there such a page?"
"OK, yes, so, now I know I can do x, I type x into the search box for more information, and see the top results have nothing in common to me – who wants an overview and description, i see issues… mhh! So, is there somewhere else on devmo where I can directly search for the functions and args?"
thanks
Tom,
Thank you! Good to hear that you got interested in trying! 🙂
I’ll try to answer your questions as good as I can:
1. Naturally, it depends a lot on what information you’re looking for, but personally I think that https://developer.mozilla.org/En gives me a good starting point with various references. In there you have, for instance, the XUL page which contains both a link to a regular reference, as well as examples and guides.
2. This is a very relative question to try and answer… Basically, I’d say you can do anything you want to! 🙂 Bear in mind that Firefox itself is built upon CSS, JavaScript and XUL, so you can, more or less, alter anything you want to. I think that, in the end, the only thing stopping would be something considered a security or integrity threat to the end user.
3. It’s a good question. All technologies have a start page, like with XUL mentioned above, where you have some tutorials and references. However, if these don’t give you the information you’re looking for, you could use the site search.
Otherwise, a good place to go would be the extensions start page where you have links to various forums and also different IRC channels where you could look for help.
I hope this helps. Good luck!
Worth noting that the site structure image is misleading, chrome.manifest and install.rdf should reside in the parent directory, and not /chrome and /defaults as the image indicates.
Tim,
Actually, if you take a closer look at the image, you will see that chrome.manifest and install.rdf are indeed siblings to the chrome folder et al and located in the root folder – it's the default hierarchy view in Mac OS X.
If they had been child elements of, for instance, the chrome folder, they would have been indented and not start at the same place as the chrome folder, as they do now.
[…] How to develop a Firefox extension […]
[…] used the extension from a Firefox extension tutorial to create a Firefox Extension to add the videos on the Savvy Club video pages to the download list. […]
On FF3.0.10 XP experienced the capital RDF problem — kept it from installing.
So changed all instances to lower case and it was happy ( as was I 🙂
Arthur,
Yes, it's just in the blog post code displayed here, for acronyms (I have removed it now). If you download the example extension code, you will see that it is indeed lowercase.
Robert I need little help !! completed the coding packing but no effect on XUL !!
can i send the XPi to you ?? so you can find out my error ?
Abhishek,
Generally, unfortunately I don't have the time to do that. Please check if you get any errors, and alsy try testing your code with the Extension Developer extension.
If nothing helps, hopefully you can get some support in the extensions discussion group.
Very useful post. I happened to Google for getting some help for my first attempt to FF extension, and I found this post very useful. I referred several other links as well, however your post helped me understanding some basics. 🙂
Thanks!
Omkar,
Great, I'm very glad to hear it helped you!
Hi Robert,
I stumbled across your post while i am trying to build an extension. The content is very helpful indeed.However, I would be glad if you could help me in reading and simply displaying the preferences values.
I have a string preference whose value i want to read when the extension is executed.Here is the file that saves the preferences.
removethis.js
pref("extensions.removethis.basekey", "");

pref("extensions.removethis.keychar", "Q");

// See http://kb.mozillazine.org/Localize_extension_descriptions

pref("extensions.removethis@seige.description", "chrome://removethis/locale/removethis.properties");
So, as directed in your post, I load the preference manager and then try to access my preference.Here is the code for execution:
overlay.js
  onMenuItemCommand: function(e) {

	var prefs = Components.classes["@mozilla.org/preferences-service;1"]                   .getService(Components.interfaces.nsIPrefBranch);

	var basekeyvalue = prefs.getCharPref("extensions.removethis.basekey");
I am debugging using Venkman and my code exits on executing the following line :
var basekeyvalue = prefs.getCharPref("extensions.removethis.basekey");
Rajat,
Glad it was helpful!
Unfortunately, I can't help you, but I think it's related to the localization. Please ask the question in the extensions discussion group, I'm sure they can help you.
Good luck!
[…] I took the coding for it and went back to the sample Firefox extension coding I found some time back. I took out all the UNICODE and began examining it heavily. I don’t […]
[…] How to develop a Firefox extension Share and Enjoy: […]
Respect for this post.
Very high level of writing, very professional and complete.
Thanks a lot for sharing this – it is definitely the best place to start when starting extension development.
Great post, led me right into my first FF extension. Since finding your post and creating an extension, I've been trying to solve a compatibility issue with FF version 3.0.12, can't find a solution anywhere, so I thought I'd ask you. How does one make an extension compatible with a version? I've changed the 'maxVersion' attribute in 'install.rdf', deleted the 'extenions.*' files from the profile directory to have FF rebuild them, etc. I just can't get the extension to install, w/o the 'extension.checkCompatibility=false' hack. Any help would be appreciated.
Danny,
Thanks a lot, it makes me very happy to hear that!
Billiam,
Thank you, glad it inspired you! It's a good question, actually. When it comes to, sort of, re-reading the install.rdf file, I have uninstalled from within Firefox, then placed the files again it have worked.
Should work for you. If not, I don't really know how to solve it. Good luck!
hi robert your article is very clear and easy to understand.But when is drag and drop the xpi file its throwing Install script not found:204 error. Can you help me regarding this.Thanks in advance.
Regards,
Hari
Hari,
From what I know about that error, if you have coded the extension like my sample code above, is that you probably have the wrong version number for Firefox.
If that's not it, I have no idea.
Hi Robert,
Thanks for your help actually i zipped the folder along with the myextension folder name , so firefox can't able to find the install.rdf file which is present under the myextension folder.Now i zipped the files under myextension folder and tried,this time its worked.
Thanks for you help for such a nice tutorial.
Regards,
Hari
Hari,
Great that it worked out!
I'm not able to install the version of this addon that I made following this tutorial, while your version will install.
I'm in the process of debugging; the first difference I found is that your code above has and
while the code in your xpi file has </em:homepageURL> and </em:optionsURL>.
I'm not able to install the version of this addon that I made following this tutorial, while your version will install.
I'm in the process of debugging; the first difference I found is that your code above has <;/em:homepageURL> and <;/em:optionsURL>
while the code in your xpi file has </em:homepageURL> and </em:optionsURL>.
Sorry about the previous post; it looked okay in the preview.
That allowed the extension to install, but it doesn't run. It displays the statusbar icon, and allows me to change the autorun checkbox.
The next difference is the ; after chrome://global/content/customizeToolbar.xul in chrome.manifest, which is absent in the code that works.
qbsmd,
If my example extension works, feel free to use it as a base to then build your extension on.
Good luck!
Hi Robert,
Very good article. You know how can save a extension password (like gmanager or any mail checker) but doesn’t appear on about:config?? i create an prefwindow with a password field, but this appear on about:config!!!
Any idea or help!??!?!?
Best Regards!!
katador,
Interesting question! Unfortunately, I don’t know. Please try asking in the extensions discussion group.
Thank you so much Robert.
It was really helpful me to have an idea of how to do my project.
I also faced the problem on installing it. But after I see the comments I could correct it.
Thanks for the nice job done.
Ureka,
Glad that it was of use!
I tried two tutorials and couldn't get either to install. Both yours and another used the pointer file method to C:extensions . After checking the spelling a dozed times, I finally had the idea to grab the entire tutorial directory structure of each tutorial and move them to the extensions folder in my development profile. Both tutorials installed immediately! Have you ever seen this problem before?
Doh! Of course, "dozed" should have been "dozen".
DevJohn,
Hmm, not really sure why. But using <code>C:extensions</code> is just an example location, so you can have it anywhere on your machine.
[…] that I should give a presentation about developing Firefox extensions (like a live version of my How to develop a Firefox extension article). What he also did was encourage me that I could do it and that I should be brave about it, […]
Hey, so far so good. But it took me a little bit to discover a case-sensitivity issue in the very beginning of your tutorial. When accessing the Profile Manager in MacOS, you must compose the flag "-ProfileManager", as "-profilemanager" results in an "Unexpected failure" of the application to load. Cheers.
Aaron,
Thanks! But what operating system? In my experience, it has been case-insensitive.
Hello,
About the pic from section Creating folder structure and files: it looks like chrome.manifest and install.rdf are both in the chrome and default directories respectively.
If you are a newbie this might set you back a while.
Thanks for the solution anyway.
Vali,
This is the default view in Mac OS X, but I agree, it can be confusing. However, if you download the sample code, you should get a good grasp of the structure.
[…] APIs (implemented in JavaScript) to interact with the browser itself. It’s much easier than developing extensions for Firefox, which has a complicated setup and configuration and the XUL language to work with Firefox’s […]
DevJohn,
please make sure you do NOT create a true Windows shortcut but you create an empty text file with the path written inside!
I too got tricked by that at first.
Windows shortcuts (*.lnk files) do not work at all.
andy,
Thanks for emphasizing that.
You're welcome.
Well it's me again, and I hate to tell you that current Firefox nightly builds ("Minefield") do not like your kind of closure technique used in your code anymore. That is to say, that the autorun option is non-functional in every build from March 17 2010.
I do not know yet what the reason is, but I strongly doubt it's like the guys on bug 563611 said, "it's the task of the extension developer to fix this". To me it does look like a bug in the extension-handling core.
andy,
I wouldn't worry too much, until it's a final release, and then we will see. 🙂
OK, thanks for the quick reply so we will wait for the final.
Hi Robert
Very cool tutorial. It would be nice to have some images of the plugin too with the code.
Thanks
Varun
varun,
Thanks, glad you liked it!
There's a very useful tutorial at http://linuxbox.co.uk/firefox_extension_tutorial….
Hej 🙂
Thanks for the tutorial. I have a question for which apparently I wasn't able to find an answer this night:
Is it possible to have some actions performed when the extension/plugin is uninstalled?
For example: when the extension is uninstalled i would like to delete some remotely stored data (implying sending a special HTTP request) or open up a webpage etc.
Thanks and have a great weekend!
Raz,
Not as far as I know, unfortunately.
Hi Robert,
Its very nice article.Very helpful for beginners. I really appreciate for your effort. Thank you So much!!!
I have created extension as per your folder structure. Its working fine for installing directly in my profile extension folder.
I have packaged xpi file for your instructions. unfortunately it produce error “Install script not found:204”.
Right now i have zipped my extension folder and then renamed zipped folder with .xpi format.
So Please help me about this issues. How to create xpi format for extension.
Thanks in advance.
Regards
Vasanthi.
Vasanthi,
Please try the extensions discussion group and see if you can get help there.
Thanks for your response. Actually i have zipped the folder along with the myextension folder name , so firefox can’t able to find the install.rdf file which is present under the myextension folder.Now i zipped the files under myextension folder.Now its working fine
Thank you so much for your help and very nice tutorials.
Best regards
Vasanthi
I have to update my May 7th post again.
I've (preliminarily) updated to 4.0b2pre, and the non-functional autorun is still an issue in the 4.X tree.
Very useful and detailed instruction for beginners, thanks for sharing.
Great tutorial. I've developed a plugin and it's now working fine. I'm just wondering about securing it. Can you suggest a way I can encode it to prevent people stealing or copying the source and creating their own based on mine.
The stronger and more secure the better but again thanks for the the tutorial and getting me this far.
vasanthi,
I understand – good that it is ok now!
Andy,
Sounds weird, since it's a very fundamental JavaScript approach which most of the major JavaScript libraries rely on as well.
iTechRoom,
Thank you!
Dudda,
Thank you!
Can't tell you about encrypting it, but basically, all code will always be available in some way, and personally, I'd rather share the code to inspire others.
Mr. Nyman was kind enough to help me out with an issue. It's simple in retrospect, but if you're a noob at extensions like I am, and you're copying and pasting or downloading the code above just to get something to work with, then you might get an error when you attempt to install it.
The fix was to put in your version (or the latest version) of Firefox in this line of install.rdf:
<code><em:maxVersion>3.1b2</em:maxVersion></code>
So for me, I changed it to:
<code><em:maxVersion>3.6.8</em:maxVersion></code>
And it installed and worked perfectly.
Another thing that gave me a bit of trouble was the file and directory structure. I noticed in the comments that someone else was confused by the graphic at the top of this post, though it actually does show the proper format. It just looks weird to Windows users.
The install.rdf and chrome.manifest files go in the root of your extension's folder.
e.g. Contents of c:extensionsmyextension
[DIR] chrome
⌊[DIR]content
⌊browser.xul
⌊myExtension.js
⌊options.xul
[DIR] defaults
⌊[DIR]preferences
⌊prefs.js
[DIR] locale
⌊[DIR]en-US
⌊translations.dtd
[DIR] skin
⌊skin.css
chrome.manifest
install.rdf
I'm posting this to help people who might be as clueless as I am.
And thank you, Mr. Nyman, for a great tutorial! Using this as a template I was able to build the extension that I wanted. Nothing too fancy, yet, but now I know I can do it.
Jason,
Thank you!
Firefox's folder location can be quickly found by clicking Help > Troubleshooting Information.
This was useful to me in Ubuntu, when the profile location folder was not immediately apparent.
Jared STein,
Nice, thanks for the tip!
Yes, it’s just in the blog post code displayed here, for acronyms (I have removed it now). If you download the example extension code, you will see that it is indeed lowercase.
So why cant I find a tutorial that works? I keep getting errors. Even those of you who give tutorials and offer up your own example xpi install file… it still doesnt install correctly.
I get errors like "Cannot be installed because it doesnt offer secure updates"…
Or, "install script not found"
Or, "Invalid installation package"
Or, as is the case with your example, "install-2n1..rdf is not well-formed or does not exist."
Im really sick and tired of people getting praised for tutorials that dont work. I spend a half an hour of my life going through your ridiculously long tutorial, following each instruction verbatim, altering my system settings just as you told me to… and it doesnt even freaking work.
Cogito,
Maybe because web browser vendors change their code/backwards compatibility at time, and not all tutorials can constantly check that and update their information?
This tutorial was reposted by Mozilla themselves, so at one time it has been as accurate as it can get.
The code shown in this tutorial should still work (even if something in the prepared package might not anymore), and if there's an error, go to the official Mozilla list for discussing extension development to discuss what the problem can be.
[…] of Firefox it supports and other assorted information. Our install.rdf will look like this: view sourceprint? 01.<?xml version="1.0"?> 02.<RDF […]
I was getting an error about a malformed install.rdf file. In the RDF are these 2 lines:
<RDF xmlns="http://www.w3.org/1999/02/22-RDF-syntax-ns#"

          xmlns:em="http://www.mozilla.org/2004/em-RDF#">
The 2 RDFs in the attributes being upper case was causing the problem. I had to change it to:
<RDF xmlns="http://www.w3.org/1999/02/22-rdf-syntax-ns#"

         xmlns:em="http://www.mozilla.org/2004/em-rdf#">
Also, chrome.manifest and install.rdf need to be in the root level of the extension.
THANK YOU FOR THIS GUIDE!
Ethan,
I changed the case of the RDF characters in the post. The files install.rdf and chrome.manifest are indeed in the root – if you check the example package it’s all ok.
And thanks!
Hey!
Great job Robert! This is an excellent lesson by excellent teacher!
I just did my first, useful FF extension – just after one day practice. I wouldn’t be possible without your clear, complete and well explained “quick start” tutorial which gathers all essentials in one place.
Thank you!
BTW:
This example works (now in 2011 on FF3.6 Windows XP) – just after an obvious correction (em:maxVersion) mentioned earlier here by Jason
oku,
Thank you, that makes me very happy to hear!
Thank you for your tutorial. It was very helpful in getting me started.
Since my programming experience is in C, awk, shell, SQL, PHP and HTML, but not as much with JavaScript nor with the extension environment, I’m in a quandary about one thing that is keeping my extension from working.
How can the JavaScript code of the extension get the values of JavaScript variables from the current web page? In particular, I need to get an entire array and am hoping to do so without iterating through a loop, if possible.
Since I’ve noticed that you have recommended the mozilla.dev.extensions group a few times, I have also posted the question there, but was hoping you would have some insight, since my extension is patterned after the information in your tutorial.
Thank you.
CrunchyFrog,
Thanks, glad you liked it! It’s been a while since I wrote an extension, but I think fro a security point of view, allowing you access to any JavaScript variables in the page could be seen as a security threat.
Actually, i DID get it to work with wrappedJSObject (which supposedly goes through XPCSafeJSObjectWrapper to prevent risky activity). I had tried wrappedJSObject already, but it turns out the page upon which I was testing it wasn’t exactly the same as I had expected (I’ll spare you the explanation of that), but when I did get the correct page, my extension worked.
In general, here is how it worked:
var cw = gBrowser.contentWindow;

var myVar = new Array;
myVar = cw.wrappedJSObject.varFromThePage;
CrunchyFrog,
Ah, right, I can imagine wrappedJSObject could give you access to that!
Glad it works for you now!
Hi Robert,
1st of all, thanks a lot for the tutorial.. its wonderful…!
I have a doubt though, I tried it the way you have explained, by creating a pointer file, keeping all the other files to other location.. but it not working for me.. totally confused how I can make it work.. I am using Firefox 3.6.10, on a windows machine (also tried on Ubuntu) but still nothing.. reading the comments above seems it is working for others using Firefox 3.6 ( oku’s comment above..). Is there a way to find out why it might not be working for me?
What I am doing:
i. Pointer file has the same name as of the em:id in the install.rdf, no extension at all.
ii. Pointer file points to the path of the parent folder of the folder with the same name as of the pointer file. Also tried with the same folder itself.
iii. Inside the folder placed all the extracted files. (have checked the max version.)
iv. Restarted Firefox.
Nothing! 🙁
Please help if you can…
Nikhil,
Glad you liked it!
It sounds like you are really doing all the right things. However, if all fails, you can write the extension, install it and then edit the files in the location where they get installed.
hi…
i wanted to know how can we use firefox’s built in features..?
I want it for developing an extension..It needs to be integrated with some firefox features..
Fivya,
I recommend looking at https://developer.mozilla.org/en-US/addons for more info
I’m trying this on Firefox 4 right now, and when I open up FF, the linktargetfinder@robertnyman.com pointer file gets erased. I can watch it disappear from the extensions directory when I open FF.
Any ideas?
Ruffin,
I have no idea why that would happen. Have you tried to update the maxversion number?
Nice tutorial, and very easy and very useful for newbie. I learn from it thanks author.
Do you know how to silently install a Firefox’s extension into visitor’s browser, is it possible? Thanks!
Leo,
No, it’s not possible, since that would be terrible if anyone could force install something on a user’s computer without the user being able to control it.
Thank you very much for the tutorial. It’s very helpful!
hi robert may I know why I get corrupter install after I edited your xpi, after ziping, i get corrupted, How do I solve it?
Leo,
You’re welcome!
James,
Sorry, no idea why that would be.
Nice content & explanation. Gr8 way to start. Thank you 🙂
Deepak,
Thanks, glad you liked it!
Hi!
Thanks for the awesome guide… I am having a perplexing issue with this though. I tried zipping up all the directories and then changing the extension from .zip to .xpi. Firefox tells me the extension is corrupt.
So, I tried your zip file and renamed it to .xpi. Again, it was corrupt and could not be installed.
Then I tried your xpi file and it installed just fine.
I am running Windows 7 ultimate 64 bit … not sure why it’s flaking on me.
TechieGeek,
It probably is that you are zipping the folder as well. You should only zip the containing files of the extension folder, not the folder itself.
Thanks for a helpful tutorial.
A minor point, but one that will block some people: when starting the profile manager, you have to close Firefox first (http://support.mozilla.org/en-US/kb/profile-manager-create-and-remove-firefox-profiles#w_starting-the-profile-manager). Otherwise, running “firefox -P” will just give you a new window of the already running browser and profile.
Good point, thanks!
I need extension for firefox.
save information from page to text file:
1. link site
2. header page
3. keyword
4. description
format target file:
link site|header page|keyword|description
link site|header page|keyword|description
link site|header page|keyword|description
work extension:
in tool bar press button, data saved in target text file.
please create this extension, thank you.
please contact with me for add information.
thank you again.
Dmitry,
Please ask in the extensions discussion group.
Wow a great piece of write-up, this was really helpful, although i had a problem of compatibility after creating the extension. The extension was not compatible with my Firefox 25.0.1.
Please what can i do to solve this?
Thank you.
Amber,
Thanks, glad you liked it!
Please ask for help for that in the extensions discussion group.
Your add-on failed validation with 2 errors.
No install.rdf or package.json foundThe package is not of a recognized type.
please help me… how can remove this error
I’d recommend asking for help in the extensions discussion group.